
Violet Blanket
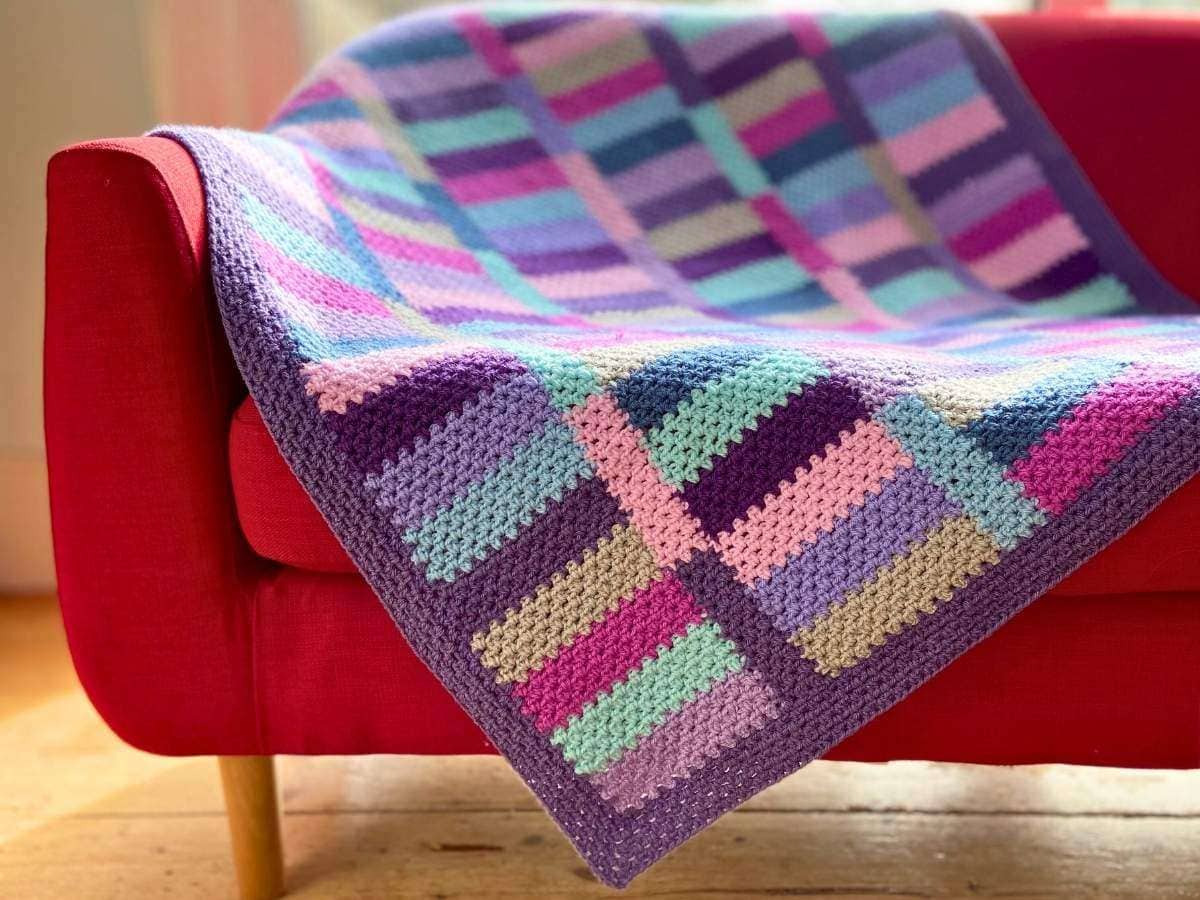
I loved making my Rainforest Crochet Patchwork Squares Blanket so much that I wanted to use the same stitch and joining technique to create another blanket. I decided to work with rectangles rather than squares, joining them together as I went to create a colourful patchwork design.
The blanket is made using half treble crochet (htr) in UK terms, or half double crochet (hdc) in US terms, worked in groups of two stitches. I used 10 different colours of Stylecraft Special DK for my blanket, but this design would also be a great way to use up yarn from your stash.
The rectangles are joined using a slip stitch join-as-you-go technique. This takes a little practice to get used to, so I recommend trying the joining method on a small sample before starting your blanket.
Instructions
This blanket is worked in vertical strips. You start by making the first strip, then add the subsequent strips while joining them to the previous strip as you go.
The first strip consists of 24 wide rectangles, each made up of 6 rows. The second strip consists of 8 tall rectangles, each made up of 18 rows. Continue alternating between these two types of strip, following the different colour orders shown in the chart.
The blanket is worked in half treble crochet (htr in UK terms, or hdc in US terms), in groups of two stitches.
Notes on joining (do a practice sample first)
Once you have made the first vertical strip, you will be then be adding subsequent strips using a slip stitch join-as-you-go. I recommend that you try out this joining method in advance of starting the whole blanket.
A video tutorial of the joining method is available.
Left-handed? A separate left-handed joining guide is included below.
Materials
Crochet Hook
4mm or size needed to achieve gauge.
Yarn:
I used Stylecraft Special DK in 10 different colours for my Violet Blanket.
For the 10 colours, you will need:
- 9 colours: 100g (295m) of each colour
- 1 colour: 200g (590m), which is also used for the border
For my blanket, I used:
- Wisteria – Colour A
- Sherbet – Colour B
- Magenta – Colour C
- Silver – Colour D
- Violet – Colour E – 200g (590m)
- Cloud Blue – Colour F
- Lavender – Colour G
- Proper Purple – Colour H
- Clematis – Colour I
- Denim – Colour J
You can use other DK weight yarns if you prefer, and this blanket would also be a great way to use up yarn from your stash.
Notions
Scissors, needle to weave in ends
Finished Size
Approximately 107 cm x 104 cm, the actual size of your blanket will depend on your tension (how tightly you crochet).
Skill Level
Intermediate
Gauge
1 wide rectangle (6 rows, starting chain of 23): approximately 14 cm x 4.5 cm. Adjust your hook size if necessary. Gauge is not critical for this project, but differences in tension may affect the finished size and yarn quantities.
Abbreviations/Crochet terminology
Pattern is written in UK terms.
ss | Slip stitch |
htr | Half treble crochet |
ch | Chain |
st(s) | Stitch(es) |
beg-ch | Beginning chain |
*to* | Repeat the instructions between the asterisks as specified. |
htr cluster | A group of 2 half treble crochet stitches worked in the same space or stitch |
Stitch Guide/Conversion Guide
UK term | US term | Description |
|---|---|---|
Half Treble Crochet (htr) | Half Double Crochet (hdc) | Yarn over hook. Insert hook into stitch, yarn over hook, pull through stitch (3 loops on hook), yarn over hook, pull through remaining three loops to leave 1 loop on the hook |
Slip Stitch (ss) | Slip Stitch (ss) | Insert hook into stitch, yarn over hook, pull through stitch and through loop |
Chain (ch) | Chain (ch) | Yarn over hook, pull through loop |
Instructions for the 1st vertical strip (wide rectangles)
Foundation Row – Using yarn A (Wisteria) chain 23;
R1 – 2htr in 3rd ch from the hook, *skip 1 ch, 2htr in next ch*, repeat from *to* until last 2 chains, skip ch, 1htr in last chain, ch2, turn;
R2 – for row 2 and subsequent rows you will be working in the spaces between the htr clusters from the row below as follows: 2htr in first space (the first space is between the single htr worked at the end of row 1 and the 2htr), 2htr in each space until the last space (in between the 2htr and turning chain from the row below), insert 1htr in this last space, ch2 turn;
R3 – 2htr in 1st space, 2htr in each space until last space, 1htr in last space, ch2, turn;
R4-R5 – repeat row 3;
R6 – repeat as for row 3 but when you come to the working the last htr, stop before the final yarn over and introduce yarn B (Sherbet) for the final yarn over;
R7-R12 – work as for row 3, using yarn B (Shebert);
Subsequent Rows – continue to work 6 rows in each colour (Fig 1 & Fig 2) until you have completed 24 wide rectangle colour blocks (you should have a total of 144 rows for the first strip). For colour order see Fig 3.

Fig 1 Fig 2


Instructions for the 2nd Vertical Strip (tall rectangles)
The second strip is worked whilst joining to the 1st strip. If you are left-handed – please see section below this.
Foundation Row – Using yarn E (Violet), attach to the end of the foundation row from the first rectangle of the first strip (Fig 5) with a ss (placement indicated in Fig 4), chain 7;
Fig 4 Fig 5 Fig 6


R1 – 2htr in 3rd ch from the hook, *skip 1 ch, 2htr in next ch*, repeat from *to* until last 2 chains, skip ch, 1htr in last chain (Fig 6), ss into row 1 of the 1st vertical strip (around the post of the end stitch) (Fig 8) (placement indicated in Fig 7), ch1, ss in row 2 of the 1st vertical strip (around the post of the end stitch) (Fig 10) (placement indicated in Fig 9), turn (Fig 11);
Fig 7 Fig 8 Fig 9


R2 – for row 2 and subsequent rows you will be working in the spaces between the htr clusters from the row below. 2htr in the space between the single htr and the first group of 2htr from the row below (Fig 12), 2htr in each space until the last space (in between the 2htr and turning chain from the row below), insert 1htr in this last space, ch2 turn;
Fig 10 Fig 11 Fig 12


R3 – 2htr in 1st space, 2htr in each space until last space, 1htr in last space, ss into row 3 of the 1st vertical strip (around the post of the end stitch), ch1, ss in row 4 of the 1st vertical strip (around the post of the end stitch), turn;
R4-R17 – repeat as for row 3, ss into the corresponding row from vertical strip 1 at the end of each odd numbered row, ch1 and ss into the row above to start an even numbered row;
Fig 13 Fig 14 Fig 15


R18 – repeat as for row 3 but when you come to the working the last htr, stop before the final yarn over and introduce yarn I (Clematis) for the final yarn over (Fig 14);
Fig 16

Video of Joining Method
A video tutorial of the joining method is available.
Subsequent Rows – continue to work 18 rows in each colour until you have completed 8 tall rectangle colour blocks (you should have a total of 144 rows for the second strip).
Joining the Next Strip (Left-Handed Version)
If you are left-handed, you can work the join in the opposite direction to the video. The technique is exactly the same — you are mirroring the steps.
The key idea:
You are joining each row of your current strip to the matching row on the previous strip using slip stitches.
How to work the join
Work your row as normal until you reach the edge where the strips will be joined.
Then:
- Ss into the last stitch of the corresponding row on the adjacent strip (around the post of the end stitch), ch1, ss into the next row above on the adjacent strip (again around the post of the end stitch), turn
- 2htr in the space between the single htr and the first group of 2htr from the row below, 2htr in each space across until the last space, 1htr in the final space, ch2, turn
- 2htr in first space, 2htr in each space across until the last space, 1htr in last space
Repeat steps 1–3 for each row.
Helpful tips
- Focus on matching row to row, rather than copying the exact hand movements from the video
- Your work will move in the opposite direction to a right-handed version
Subsequent Vertical Strips
Continue to add vertical strips alternating between a strip of wide rectangles and a strip of tall rectangles until you have completed 11 strips, finishing with a wide rectangle strip.
Fig 17 Fig 18


Border
The border is simply 6 rounds of htr clusters.
Border R1 – Pull up a loop in any corner of the blanket, ch2 (counts as 1htr), 1htr in same space, work 2htr in each space formed between the clusters (Fig 19).
Fig 19 Fig 20 Fig 21


Continue around the blanket working [2htr, ch2, 2htr] in each corner space (Fig 22), when you reach the start, work 2htr, ch2 and then ss in top of beg-ch (Fig 23).
Fig 22 Fig 23 Fig 24


Border R2 – Turn your work (Fig 24), ss into the ch2 space just formed in the corner (Fig 25), Ch2 (counts as 1htr) (Fig 26), 1htr in same space (Fig 27), work 2htr in each space around the blanket, working (2htr, ch2, 2htr) in each corner. When you reach the starting corner, work 2htr, ch2 and then ss in top of beg-ch.
Fig 25 Fig 26 Fig 27


Border R3-R6 – repeat round 2. Fasten off and weave in ends.

Enjoy your blanket.