
Honeycomb Hexies – a stash-buster project

These Honeycomb Hexies are really simple hexagons to crochet. You can have lots of fun using up your yarn scraps to make a colourful arrangement of hexagons. Perfect for a stash-buster project.
Crochet Skill
Suitable for beginners.
Materials
Yarn: I used Stylecraft Special DK in colours Pale Rose, Silver, Buttermilk, Grape, Raspberry, Blush and Lemon. Each hexagon requires approximately 8-10g of DK yarn. This pattern will work with other weight yarn and the appropriate hook but the amount of yarn required will differ.
Hook: 4mm
Abbreviations/Crochet terminology
- UK terms are used throughout.
- ss slip stitch
- tr treble crochet
- ch chain
- beg-ch beginning chain
- *to* instructions between asterisks will be repeated as specified
Stitch Guide/Conversion Guide
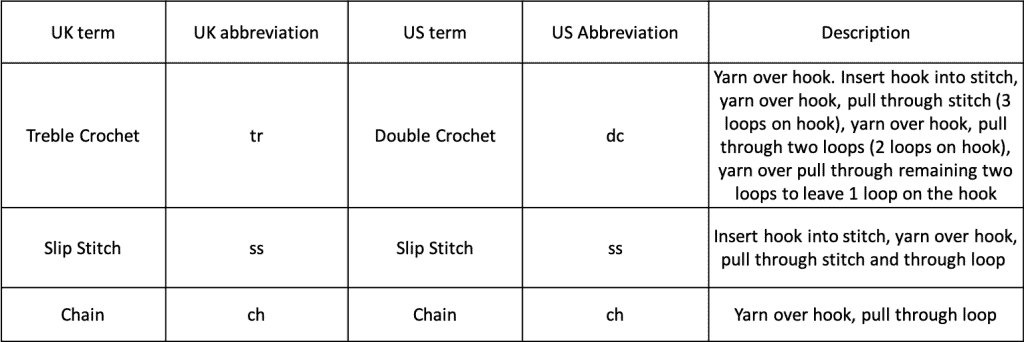
Notes about the solid hexagons
The hexagon is worked in 3 rounds. On the first round the stitches are worked into the ring/magic circle. Rounds 2 and 3 are worked in between the stitches of the previous round.
Instructions
Round 1
1. Make a slip knot, ch4, (fig 1)
2. Ss in first chain to form a ring (or form a magic circle) (fig 2).

Fig 1
Fig 2


3. Ch3 (counts as 1tr) (fig 3).
4. 1tr in centre of ring (Fig 5) (the centre of the ring is indicated by the needle in fig 4)
Fig 3 Fig 4


5. Ch1, [2tr, ch1] five times into the ring. Ss into top of beg-ch (Fig 6). [6 groups of 2tr with 1 chain between each 2tr cluster]
Fig 5 Fig 6


Round 2
6. Ch3 (counts as 1tr) (this is the second treble of the final corner worked at the end of this round) (fig 7).
Fig 7
Fig 8


7. Work 1tr in the space between the stitches of the round below (fig 9) (indicated by needle placement in fig 8).
8. Work [1tr, ch1, 1tr] in the next space (this is the ch1 space from the round below), this forms a corner (fig 10).
Fig 9 Fig 10


9. *1tr in next space (fig 11).
10. [1tr, ch1, 1tr] in next ch1 space from round below,* 1tr in next space, continue from *to* three more times, 1tr in final ch1 space, ch1 and ss to top of beg-ch (this forms the final corner) (fig 12). [6 [1tr, ch1, 1tr] corner clusters with 1tr in space between each corner]
Fig 11 Fig 12


Round 3
11. Ss into the next space (fig 14) (shown by needle placement in fig 13).
Fig 13 Fig 14


12. Ch3 (counts as 1tr) (fig 15).
13. 1tr in next space, *[2tr, ch1, 2tr] in corner space, work 1tr in next 2 spaces*, continue from *to* four more times, [2tr, ch1, 2tr] in final corner space, ss to top of beg-ch. (fig 16). [[2tr, ch1, 2tr] in six corners and 2tr in spaces in between corners]
Fig 15
Fig 16


You should now have formed your hexagon. Fasten off and weave in the ends.
Make as many as you like and then sew them together – I made 95 hexagons for my sample. I used the mattress stitch to sew my hexagons together. I decided not to make any half hexagons to make the sides straight, as I liked the honeycomb effect.

