How to Crochet a Granny Star

This free Granny Star crochet pattern takes the familiar look of a traditional granny square and transforms it into an eight-point star. It is worked in rounds using simple granny clusters, with a clever skipped space introduced later in the pattern to sharpen the star points.
About the Granny Star
- Eight-point star shape
- Based on traditional granny-square construction
- Worked in rounds
- Easy to make larger or smaller
- Suitable for blankets, cushions, mats and coasters
- Great for experimenting with colour
Materials
You can use any yarn with a corresponding crochet hook. For my sample, I used the following materials:
- Stylecraft Special DK – Pomegranate, Lemon, Wisteria, Turquoise, Blush and Sherbet
- 3.5 mm crochet hook
- Scissors
- Yarn needle for weaving in ends
Abbreviations/Crochet terminology
UK terms are used throughout.
tr | Treble Crochet |
ss | Slip stitch |
ch | Chain |
* to * | Instructions between asterisks will be repeated as specified |
Beg-ch | Beginning chain |
st(s) | Stitch(es) |
sp(s) | Space(s) |
Treble Cluster | 3 treble crochet stitches worked in the same stitch or space |
US terminology: UK treble crochet (tr) is equivalent to US double crochet (dc). All other stitches use the same terminology.
Gauge
Gauge is not important for this pattern. Use the hook recommended for your yarn or adjust your hook size to achieve the look and tension you prefer.
Notes about the Granny Star
- All rounds begin with ch 3, which counts as 1 tr unless otherwise stated.
- Turn your work over at the beginning of each round. This helps prevent the star from twisting and helps keep it flat.
- The space between treble clusters refers to the natural gap between the clusters from the previous round.
- A ch-1 corner space (point) is the ch-1 space at the tip of each star point.
- The pattern uses ch 1 at the star points. If you find your points need more definition, you can try ch 2 instead. I recommend making a small test sample first.
- When changing colours, you can join your new colour at a different point each round to distribute the joins around the star.
Tips for a Flat Granny Star
The Granny Star has quite a lot of shaping, particularly around the eight points. When working Round 7, take care not to crochet too tightly around the skipped space. The skipped space is designed to pull the fabric inward and sharpen the points, so pulling the stitches too tightly can cause the points to curl upwards.
Keep your tension relaxed and allow the stitches on either side of the skipped space to sit naturally. If your star is still curling, gently blocking it and pinning the eight points into shape should help it lie flat.
Remember to turn your work at the beginning of every round, as this also helps prevent the star from twisting and helps keep it flat.
Written Pattern for the Granny Star
Start: Ch4, ss into first ch to form a ring (or use a magic circle.)
Round 1:
- Ch3 (counts as 1tr), 2tr into ring.
- *Ch1, 3tr into ring*; repeat from * to * twice more.
- Ch1, ss into top of beg-ch3. Fasten off.
You now have four treble clusters and four ch-1 spaces.

Round 2:
- Turn over. Join a new color in any ch-1 sp.
- Ch3, 2tr in same ch-1 sp.
- *(3tr, ch1, 3tr) in next ch-1 sp*; repeat from * to * twice more.
- 3tr in the ch-1 sp where you started the round, ch1, ss in beg-ch3. Fasten off.
Round 2 forms 4 corner points.

Round 3:
- Turn over. Join new yarn in any ch-1 corner sp.
- Ch3, 2tr in same ch-1 sp.
- *Work (3tr, ch1, 3tr) in the next sp between treble clusters*; repeat from * to * around, working into each corner ch-1 sp and each side sp between treble clusters.
- In the ch-1 corner sp where you started the round work (3tr, ch1), ss in beg-ch3. Fasten off.
You have now started to form the 8 points of the star.

Round 4:
- Turn over. Join new yarn in any ch-1 corner sp (point).
- Ch3, 2tr in same ch-1 sp.
- Work (3tr, ch1, 3tr) in each ch-1 corner sp (point) around.
- In the ch-1 corner sp (point) where you started the round work (3tr, ch1), ss in beg-ch3. Fasten off.
Round 4 strengthens the eight star points and begins to establish the final star shape.

Round 5:
- Turn over. Join new yarn in any ch-1 corner sp (point).
- Ch3, 2tr in same ch-1 sp.
- *Work 3tr in the sp between the treble clusters along the side, (3tr, ch1, 3tr) in next corner ch-1 sp (point)*; repeat from * to * 6 more times.
- 3tr in the sp between the treble clusters along the final side.
- In the ch-1 corner sp (point) where you started the round work (3tr, ch1), ss in beg-ch3. Fasten off.

Round 6:
- Turn over. Join new yarn in any ch-1 corner sp (point).
- Ch3, 2tr in same ch-1 sp.
- *3tr in each sp between the treble clusters along the side, (3tr, ch1, 3tr) in next corner ch-1 sp (point)*; repeat from * to * 6 more times.
- 3tr in each sp between the treble clusters along the final side.
- In the ch-1 corner sp (point) where you started the round work (3tr, ch1), ss in beg-ch3. Fasten off.

Round 7 – Sharpening the Star Points:
- Turn over. Join new yarn in any ch-1 corner sp (point).
- Ch3, 2tr in same ch-1 sp.
- *3tr in each sp between treble clusters along the side, except the middle sp (do not work into it – shown by the needle in the photos below), (3tr, ch1, 3tr) in next corner ch-1 sp (point)*; repeat from * to * 6 more times.
- 3tr in each sp between treble clusters along the final side, again skipping the middle sp.
- In the ch-1 corner sp (point) where you started the round work (3tr, ch1), ss in beg-ch3. Fasten off.

Why do we skip a space?
Skipping the middle side space reduces the number of clusters along each side and pulls the fabric inward, creating the sharper points of the star.
Needle indicates the skipped space in round 7.


Round 8: Repeat Round 6.
Subsequent rounds: Continue repeating Rounds 6–8 until your Granny Star reaches the desired size. Change colours as preferred.

Colours Used
Stylecraft Special DK:
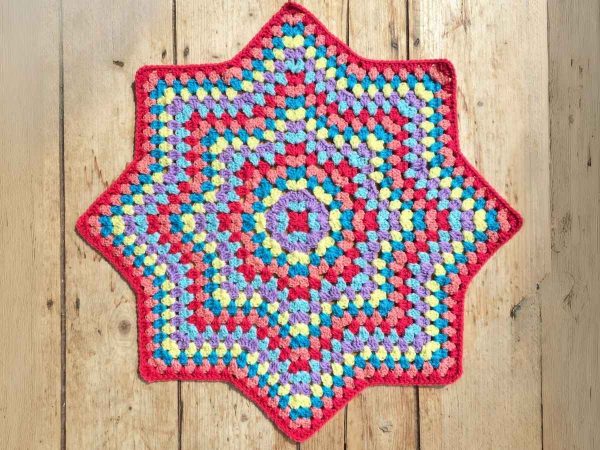
The sample uses the following six-colour sequence, starting with Pomegranate:
- Pomegranate
- Sherbet
- Wisteria
- Lemon
- Turquoise
- Blush
Repeat this six-colour sequence as desired.
Weave in any remaining ends and gently block your Granny Star if required. Your star is now ready to use on its own or combine with other motifs to create a larger project.
Finished size: The size will depend on your yarn, hook and number of rounds. The sample shown has 13 rounds.
What Can You Make with a Granny Star?
Granny Stars can be used individually as decorative motifs, or joined together to create larger crochet projects. They work particularly well for blankets and throws, but you can also use smaller stars for cushions, table mats, coasters and other home décor projects.
Experiment with different colour combinations to create completely different looks, from bright and colourful stars to a more coordinated neutral palette.